

Today we’re going to go through swapping and installing competition sights for the Glock 35 Gen 4 pistol I am T&Eing. Installing competition grade sights is not difficult and does not require a lot of expensive tools. This is something you can easily do for yourself, and once you’ve done it a few times it’s a breeze. Most competition sights come with the dove tail slightly oversized so that you get a good tight fit. The sights I am installing on this pistol are Dawson Precision’s Perfect Impact Sights, which includes a hex key, a front sight screwdriver, and a nylon tip rear sight pushing punch. I recommend using the punch included with the Dawson Precision sights rather than a factory Glock sight pushing tool for this installation.
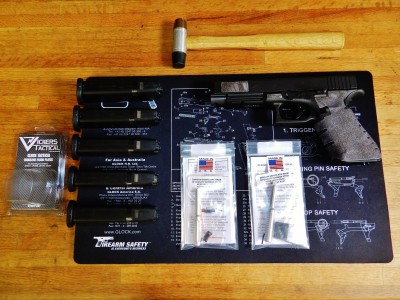
Installing competition sights does not require a bunch of expensive tools. All we need today is:
- Vise
- Gunsmithing hammer
- Small triangle file
- Loctite permanent adhesive
- Nylon tipped punch (included with Dawson Precision sight)
- Front sight screw driver (included with Dawson Precision sight)
- Hex key (included with Dawson Precision sight)
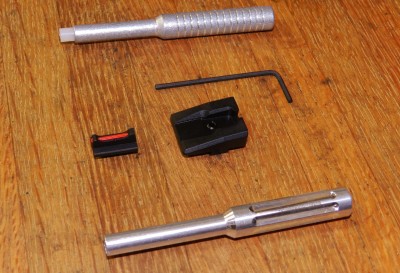
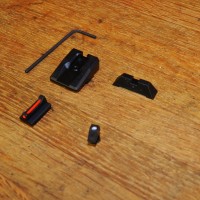
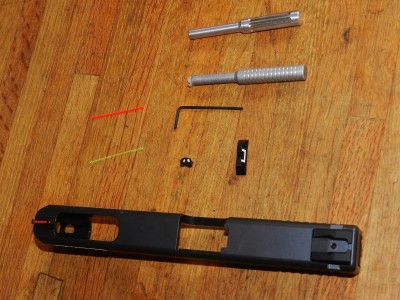
The first thing I always do when I get new parts is remove them from the packaging, make sure nothing is missing, and inspect the quality. With most companies this really isn’t necessary, but no one is without fault and it’s always better to discover if something is missing or needs to be returned, prior to beginning the installation. Dawson’s sights pulled from the package come with the front and rear sight, nylon tipped sight punch, allen key and screw driver for the front sight.
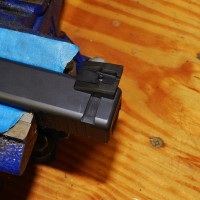
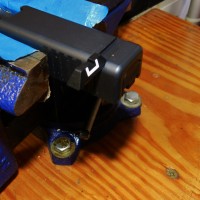
Now we will prep the pistol to install the sights. As always, first make sure the gun is clear, with an empty chamber and no mag in the pistol. We can now disassemble the pistol, removing the slide, the recoil system, and the barrel. Secure the slide in the vise, using cardboard cuts to prevent damage to the slide.
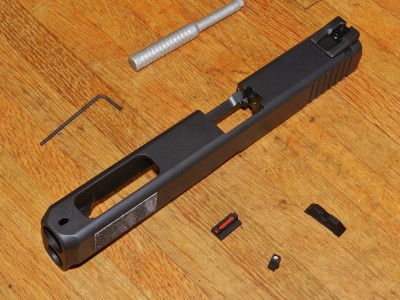
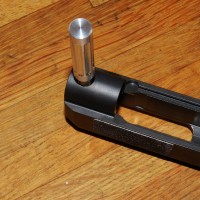
Next, use the included nylon tip sight punch and tap out the factory rear sight. It does not take a lot of force, so be careful not to swing too hard or scratch up the slide. Once the factory rear sight is removed, pull the slide out of the vise and inspect it to make sure there are no burrs or anything else that will create problems. With the slide out of the vise, use the included screwdriver to remove the factory front sight. This tool is basically a small nut driver, and once the screw is removed the plastic factory front sight will pull right off the slide.
Now we need to test fit the new rear sight. Glock’s rear sight notch is cut so it can be driven in from either side of the slide with the outside being wider than the center of the cut. The new sight should slide about half way into the slide before you run into tension. If it doesn’t, then place your triangle file flat against one side of the dove tail and use it to remove a small amount of material. I usually only do 2-3 passes before I stop and re test fit the rear sight so that I do not remove too much material. Once we have fitted the rear sight to the slide and can push it about half way into the slide, use the nylon tip sight punch to knock the sight the rest of the way in and center it in the slide. Once it is centered, use the hex key to remove the screw in the top center of the rear sight, then drop a single drop of Loctite on it and tighten it back down.


The new front sight is a simple drop-in replacement. It has a small tab that fits into the hole in the slide that you removed the factory front sight from. It is not a tight fit, so to avoid having the new front sight end up off-center, hold it in place as you turn the slide over. Just like with the rear sight, use a drop of Loctite on the front sight screw before tightening it down. The factory front sight screw and the Dawson Precision front sight screw are the same size, which is useful in case you end up dropping and losing a screw. Once the new rear sight is secured tightly, check the alignment and ensure that the front and rear sights are centered in the slide. For further guidance, check out this excellent Dawson Precision video: Installing Fixed Rear Sights with Dave Dawson.
Once you have determined that your new front and rear sights are centered and aligned, you’re ready to reassemble the pistol and hit the range to check your zero. Our next blog in Rocking Glocks will either cover trigger work or base pads, depending on which parts come in first. Thanks for taking a look and if there’s anything you’d like to see us do with the Glocks, be sure to go to our Facebook page and drop us a line, or use our website contact form. If you’re local and you want to give the pistols a spin, just come up and say hello at the next match and we’ll be happy to let you try out the guns. Thanks for all of your support!